Post Management
Create and Publish Social Media Posts
The Post Management feature allows you to create and publish posts directly to your connected Facebook and Instagram accounts from within ReadyChatAI. This centralized approach streamlines your social media workflow and enables AI-powered auto-replies on your posts.
Path: Communication > Post Management
Posts Dashboard
The Posts Dashboard provides a comprehensive view of all your social media posts across platforms. From here, you can search, filter, sort, and manage your posts, as well as create new ones.
View Modes
ReadyChatAI offers two ways to view your posts, each optimized for different workflows.
List View
The default List View displays posts in a detailed table format, ideal for quickly scanning post details and managing large volumes of content.
 The Posts Dashboard in List View showing the detailed table with all post information
The table includes the following columns:
| Column | Description |
|---|---|
| Post & Configuration | Displays the post thumbnail image, truncated message text, and engagement metrics (likes, comments, shares) for published posts |
| Platform | Shows the connected account photo, account name, and platform icon (Facebook or Instagram) |
| Reply Activity | Indicates the current auto-reply count versus the maximum replies configured for the post |
| Auto-Reply Settings | Contains a "Configure" button that links directly to the post's auto-reply settings page |
| Status | Displays a color-coded badge indicating the post status (Draft, Published, Failed, etc.) |
| Last Modified | Shows the date and time when the post was last updated |
| Actions | Provides a menu dropdown with context-aware options based on the post status |
List View uses server-side pagination with 10 posts displayed per page for optimal performance.
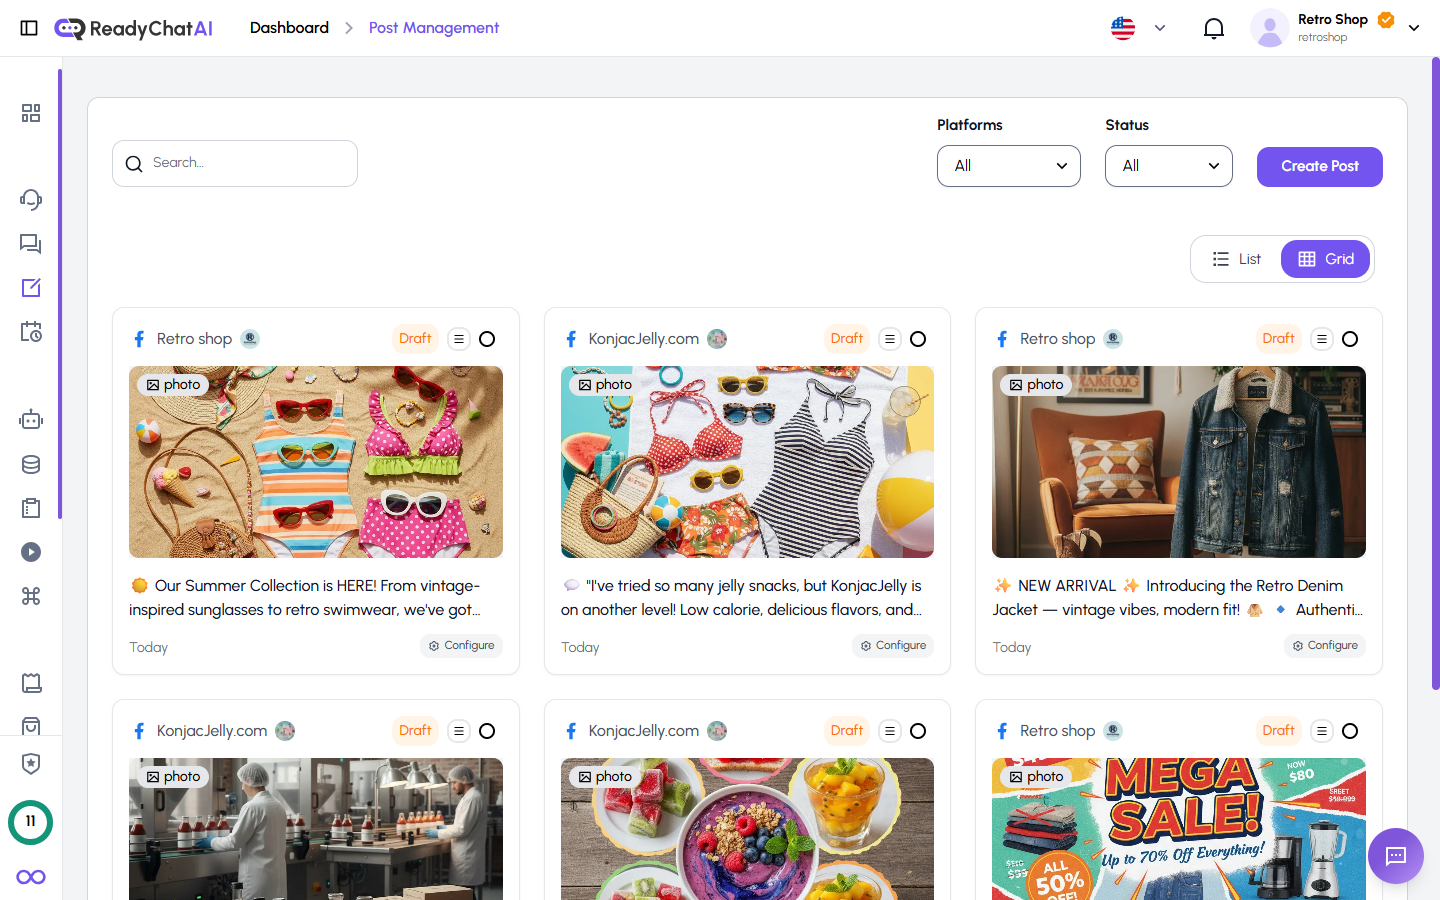
Grid View
Grid View presents posts in a visual card layout arranged in a 3-column grid, perfect for content creators who prefer a more visual browsing experience.
 The Posts Dashboard in Grid View displaying posts as visual cards
Each card displays:
- Platform icon, account name, and account photo
- Color-coded status badge
- Media image with media type badge overlay
- Post caption (2-line preview with truncation)
- Publication or last modified date
- Engagement metrics (likes, comments, shares) for published posts
- Auto-reply configuration link
- Selection checkbox for bulk actions
Grid View uses server-side pagination with 6 posts displayed per page.
You can toggle between List View and Grid View using the view mode tabs located at the top of the dashboard.
Search
The search bar at the top-left of the dashboard allows you to quickly find posts by searching across post content.
Note: The search feature uses a 300ms debounce to ensure smooth performance while typing. When you perform a search, pagination automatically resets to the first page to display results from the beginning.
Filtering Options
ReadyChatAI provides powerful filtering capabilities to help you narrow down your post list:
- By Platform: Filter posts by All Platforms, Facebook, or Instagram
- By Status: Filter posts by All Statuses, Draft, Published, or Failed
When any filter is active, a Clear All button appears, allowing you to quickly reset all filters to their default values. All filters are applied server-side and automatically reset pagination to the first page to ensure accurate results.
Sorting (List View)
In List View, you can sort posts by clicking on column headers. Click once to sort ascending, and click again to sort descending.
Sortable columns include:
- Post (sorted by message content)
- Platform
- Reply Activity
- Status
- Last Modified
Note: Sorting is handled server-side to ensure accurate results across all pages, not just the posts currently visible on your screen.
Creating a New Post
Click the "Create Post" button from the dashboard to open the post creation form. The form uses a dual-column layout — form fields on the left (two-thirds width) and a live platform preview on the right (one-third width, sticky).
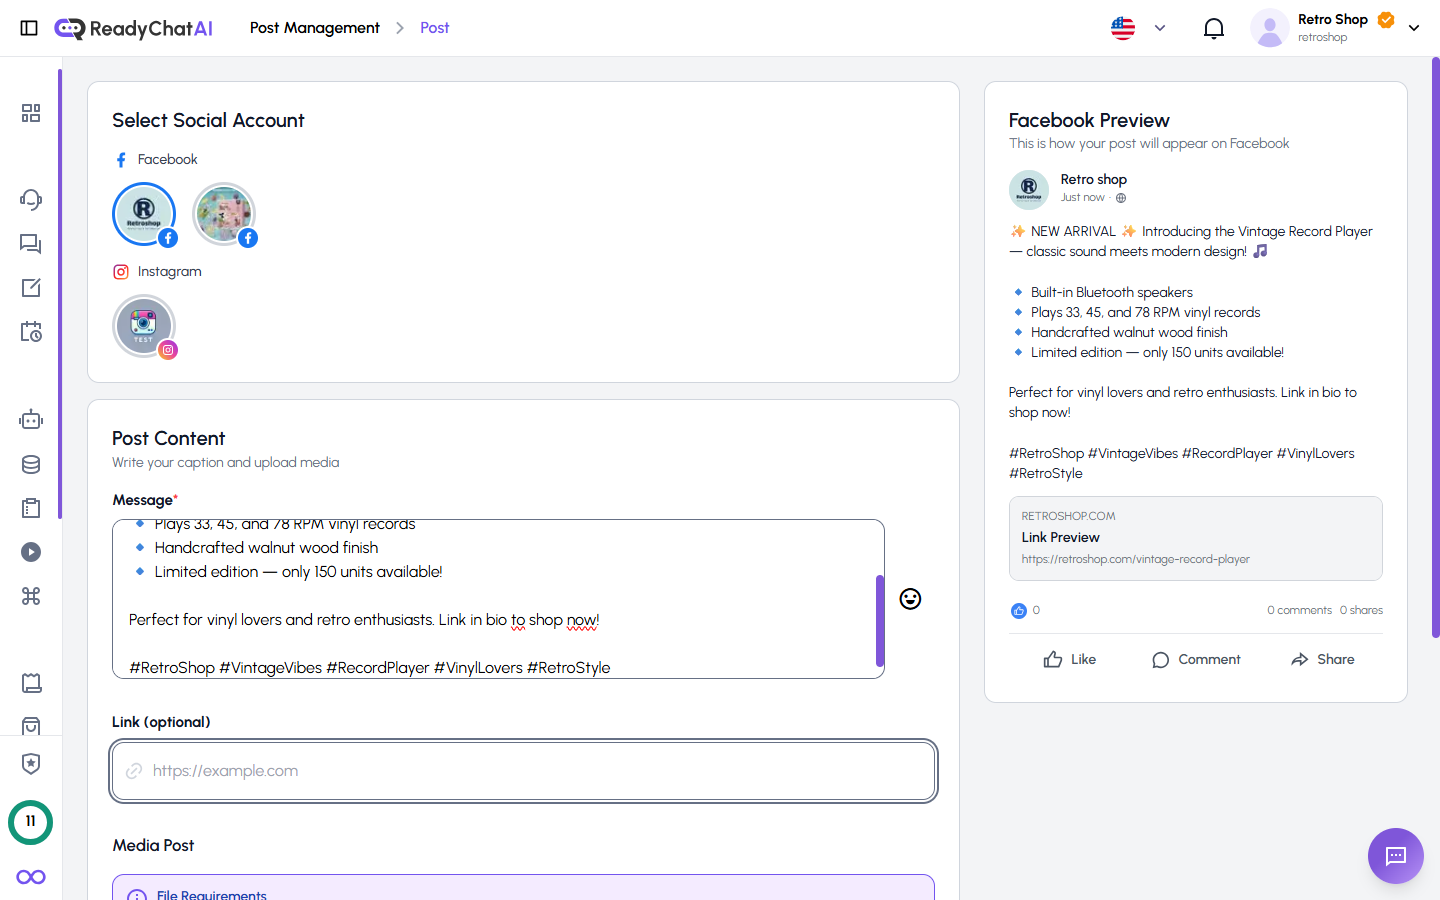 Complete post creation form with dual-column layout
Select Account
The first card in the form allows you to choose which social media account will publish the post. Accounts are grouped by platform: Facebook and Instagram. Each account appears as a clickable card with profile photo and account name. Selecting an account sets the target platform and updates the preview accordingly.
If no active accounts are available, an info banner appears with a "Go to Channels" button to connect accounts.
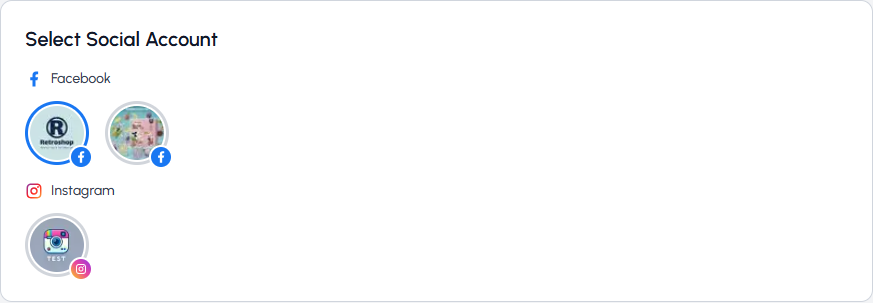 Choose the Facebook or Instagram account that will publish your post
Note: Only active, connected Facebook and Instagram accounts appear. Connect new accounts from the Channels page.
Post Content
The second card contains the main content fields for composing your post:
Message / Caption A textarea for your post text. An emoji picker button is available for inserting emojis. Instagram captions support up to 2,200 characters and a character counter is displayed to help you stay within the limit. This is a required field.
Link (Facebook only) A URL input field shown only when a Facebook account is selected. Links are clickable in Facebook posts and can drive traffic to your website. This field is not available for Instagram posts.
Media Upload A drag-and-drop file upload area for adding images to your post:
- Supports up to 20 image files
- Maximum file size: 10MB per file
- Accepted formats: JPG, JPEG, PNG, GIF, WEBP
- Images can be reordered via drag-and-drop after upload
- Required for Instagram posts, optional for Facebook
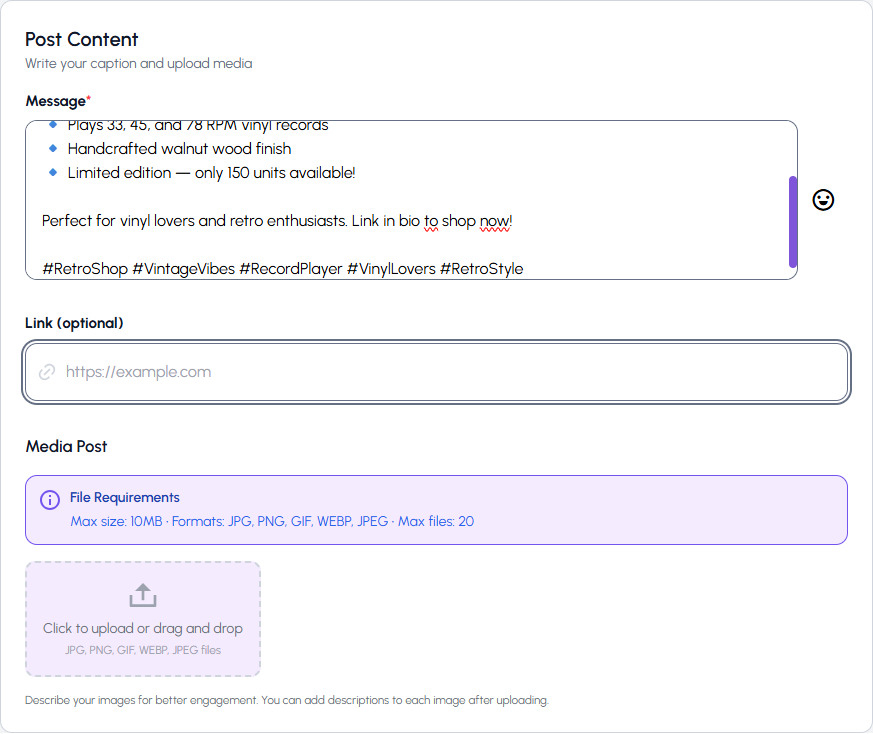 Compose your post message and add media files
Live Preview
Located on the right side of the form, the preview panel is sticky and follows your scroll. It automatically displays a Facebook Preview or Instagram Preview based on the selected account's platform. The preview updates in real-time as you type and add media, showing how the final post will appear on the social platform.
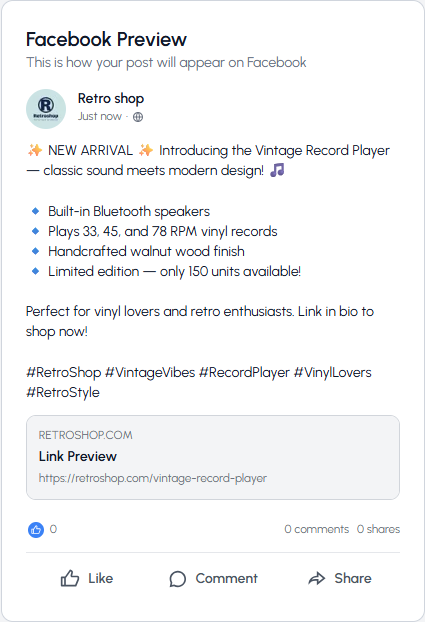 See how your post will look on Facebook or Instagram
Save or Publish
At the bottom of the form, the Ready to Post card offers:
Save Draft Saves the post without publishing. The post remains in Draft status and can be edited later.
Publish Now Creates and publishes the post immediately to the selected platform. You'll receive confirmation once published.
Note: After saving or publishing a new post, you are automatically redirected to the Auto-Reply Configuration page for that post, where you can set up AI-powered automatic responses.
Editing an Existing Post
The edit form is identical to the creation form but pre-populated with existing data. Published posts have disabled content fields — text and media cannot be changed after publication to maintain integrity with the social platform.
An "Auto-Reply" navigation button is available in the edit form to jump directly to the auto-reply configuration page for that post.
Managing Existing Posts
Viewing Post Details
Accessing detailed information about a post is straightforward. The navigation behavior depends on the post's current status:
- Published posts: Clicking the post row (in List View) or card (in Grid View) opens the Auto-Reply configuration page, where you can manage automated responses to comments
- Draft or Failed posts: Clicking the post row or card opens the Edit Post form, allowing you to modify the post before publishing or retry a failed publication
You can also access post-specific pages through the Actions menu available for each post.
Post Actions Menu
Each post includes a context-aware actions menu that provides different options based on the post's status. In List View, this menu appears in the Actions column; in Grid View, it's accessible via the menu icon on each card.
Available actions by post status:
| Post Status | Available Actions |
|---|---|
| Draft | Edit, Publish, Delete |
| Failed | Edit, Publish, Delete |
| Published | View (opens post permalink on social platform), Delete |
| Deleted | No actions available |
Editing Posts
The editing capabilities available for a post depend on its publication status:
- Draft Posts: Full editing capabilities are available. You can modify post content, change or add media, update links, and configure all other post options.
- Published Posts: Content editing is restricted — you cannot change the post text or media after publication. However, you can still modify auto-reply settings by accessing the post's auto-reply configuration page.
Tip: If you need to make significant changes to a published post's content, consider deleting the post and creating a new one with the updated content.
Bulk Actions
Select multiple posts using checkboxes (available in both List and Grid views). When you select one or more posts, a bulk actions toolbar appears.
 The bulk actions toolbar appears when one or more posts are selected
- Bulk Publish: Publish multiple draft posts simultaneously. A confirmation modal will appear before the action is executed.
- Bulk Delete: Delete multiple posts at once. A confirmation modal will appear to prevent accidental deletions.
- Deselect All: Clear the current selection and hide the bulk actions toolbar.
Note: The selection is automatically cleared when you change filters or switch between pages. This ensures that bulk actions only affect the posts you can currently see and verify.
Auto-Reply Configuration
The Auto-Reply Configuration page allows you to set up AI-powered automatic responses to comments on your posts. This is a dedicated page for each post, accessible from the dashboard or automatically after creating a new post. The page features the configuration form on the left and a post preview on the right.
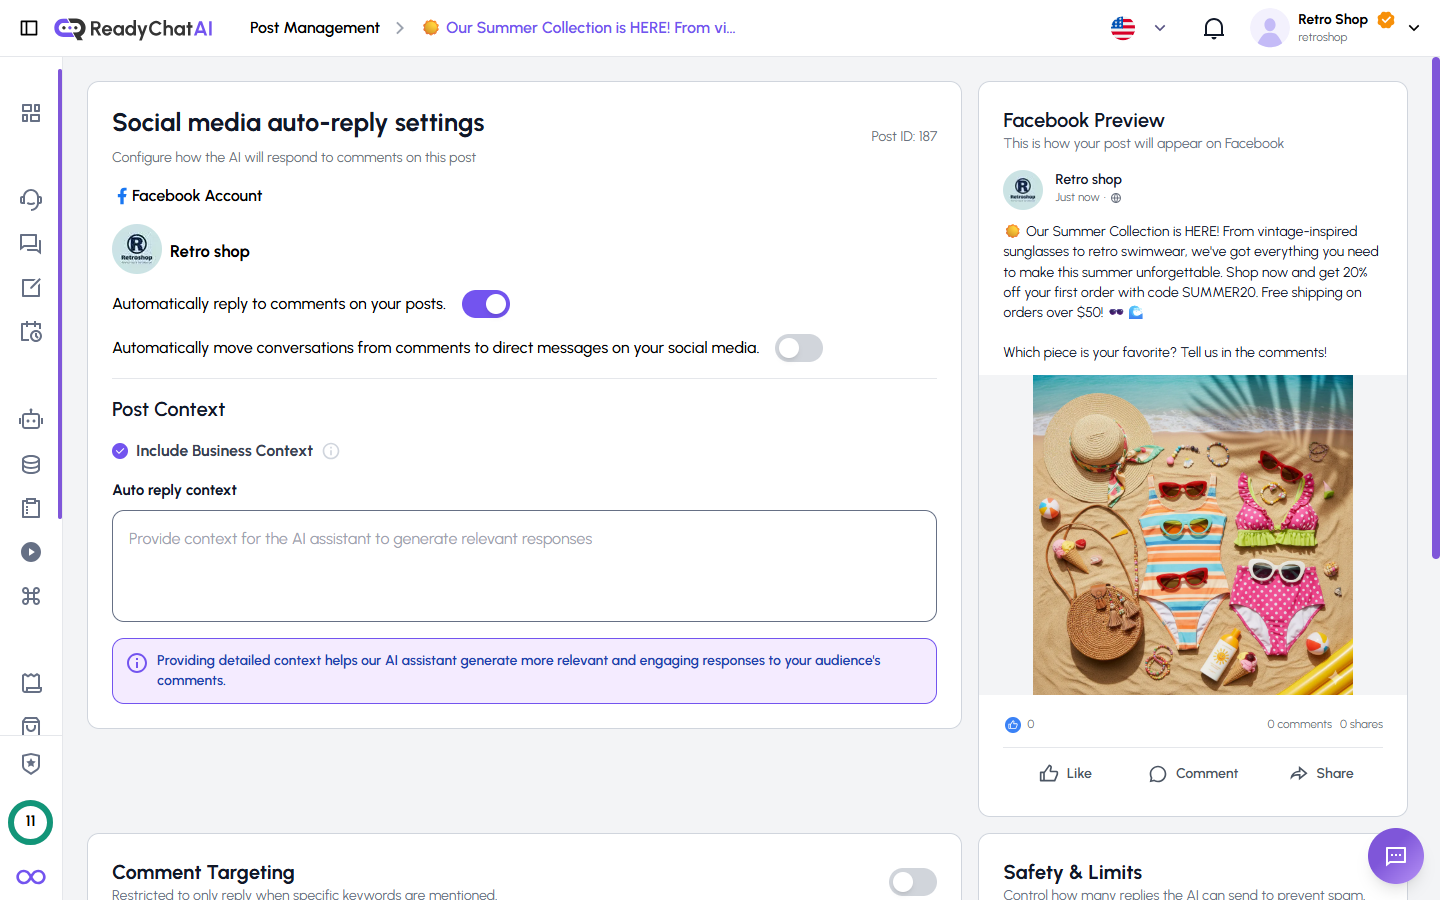 Configure AI-powered responses for post comments
Accessing Auto-Reply Settings
You can reach the auto-reply configuration page in several ways:
- From the Dashboard: Click the "Configure" button in the Auto-Reply column (list view) or the configure link on post cards (grid view)
- After Creating a Post: Automatic redirect to the auto-reply page after saving or publishing
- From the Edit Page: Click the "Auto-Reply" navigation button
- Published Posts: Clicking a published post in the dashboard navigates directly to its auto-reply page
Reply Channels
Configure how the AI delivers responses:
Reply as Comment Toggle to enable or disable replying directly as a comment on the post.
Reply as Direct Message (Facebook only) Toggle to send replies via direct message instead of as a comment. This option is only available for Facebook posts and is not shown for Instagram.
Note: Comment replies and DM replies are mutually exclusive — enabling one disables the other.
Auto-Reply Context
Provide context for the AI to generate relevant, accurate responses:
Include Business Context When enabled, the AI uses information from your business profile (products, services, hours, policies) to craft responses. This ensures consistent brand voice across all auto-replies.
Custom Context A text area where you provide specific context for this post. For example: "This post is about our summer sale. All products are 20% off through August. Free shipping on orders over $50."
The AI combines the custom context, business context (if enabled), and the original post content to generate responses that are relevant, accurate, and aligned with your brand.
Keyword Filtering
Control which comments trigger auto-replies:
Toggle OFF (default) The AI replies to all comments on the post.
Toggle ON The AI only replies when a comment contains one of your trigger keywords.
When keyword filtering is enabled:
- Add keywords using the text input and Add button (or press Enter)
- Keywords appear as badges or pills with a remove button
- Validation: Keywords must be 2-50 characters long, no duplicates allowed (case-insensitive)
- Keyword matching is case-insensitive against comment text
- Example keywords: "price", "shipping", "available", "hours", "discount"
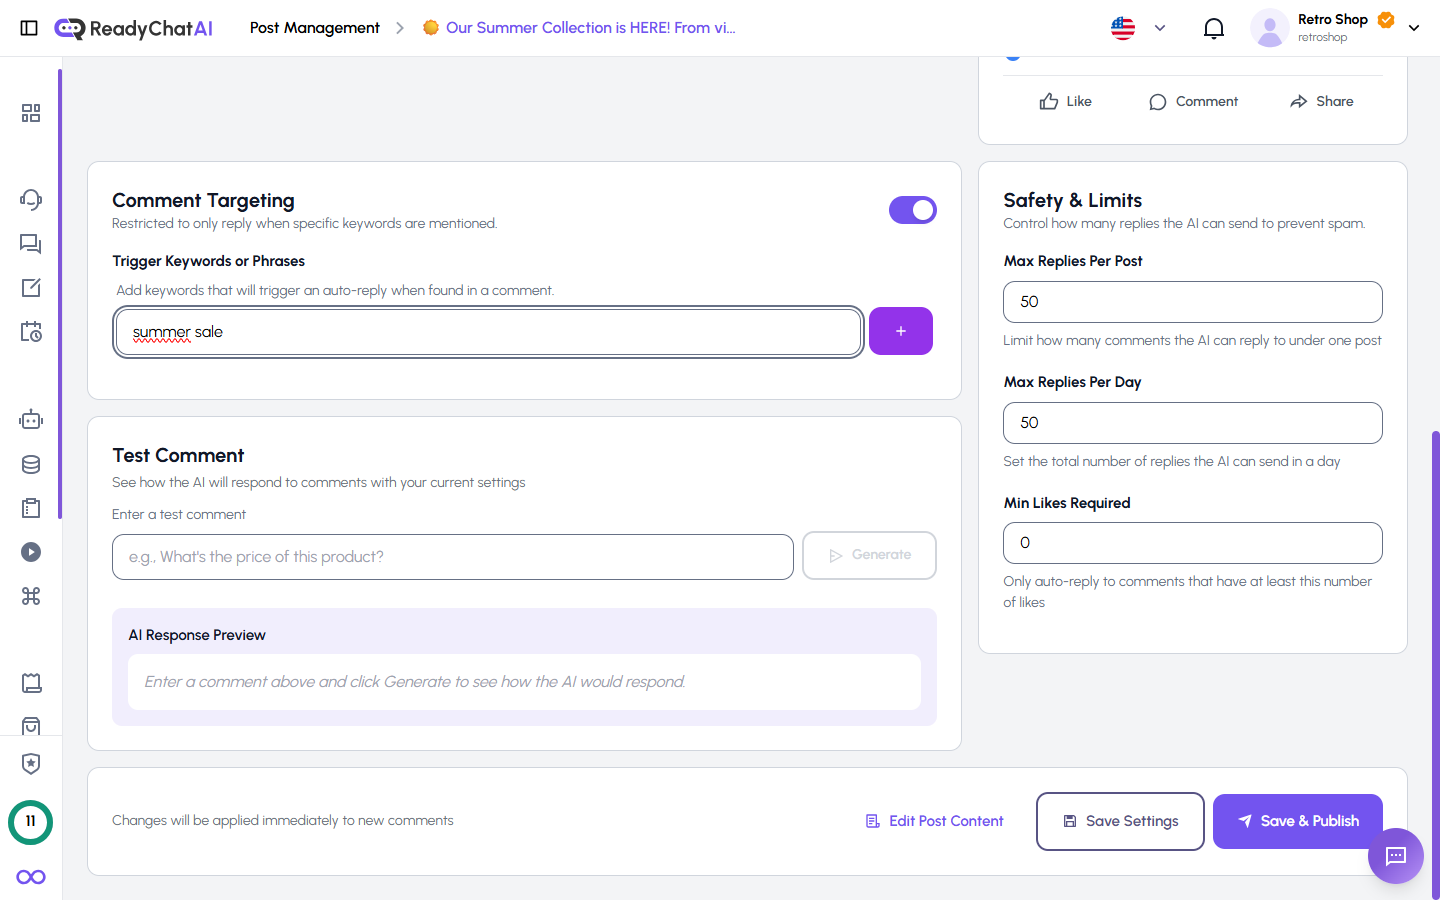 Add trigger keywords to filter which comments receive auto-replies
Test Comment
Preview how the AI will respond before enabling auto-replies:
- Type a sample comment in the test input field
- Click "Generate" to see the AI's response
- The preview shows the generated reply using your current context settings (including unsaved changes)
- A loading animation appears while the response is being generated
This is useful for fine-tuning your context and keywords before going live.
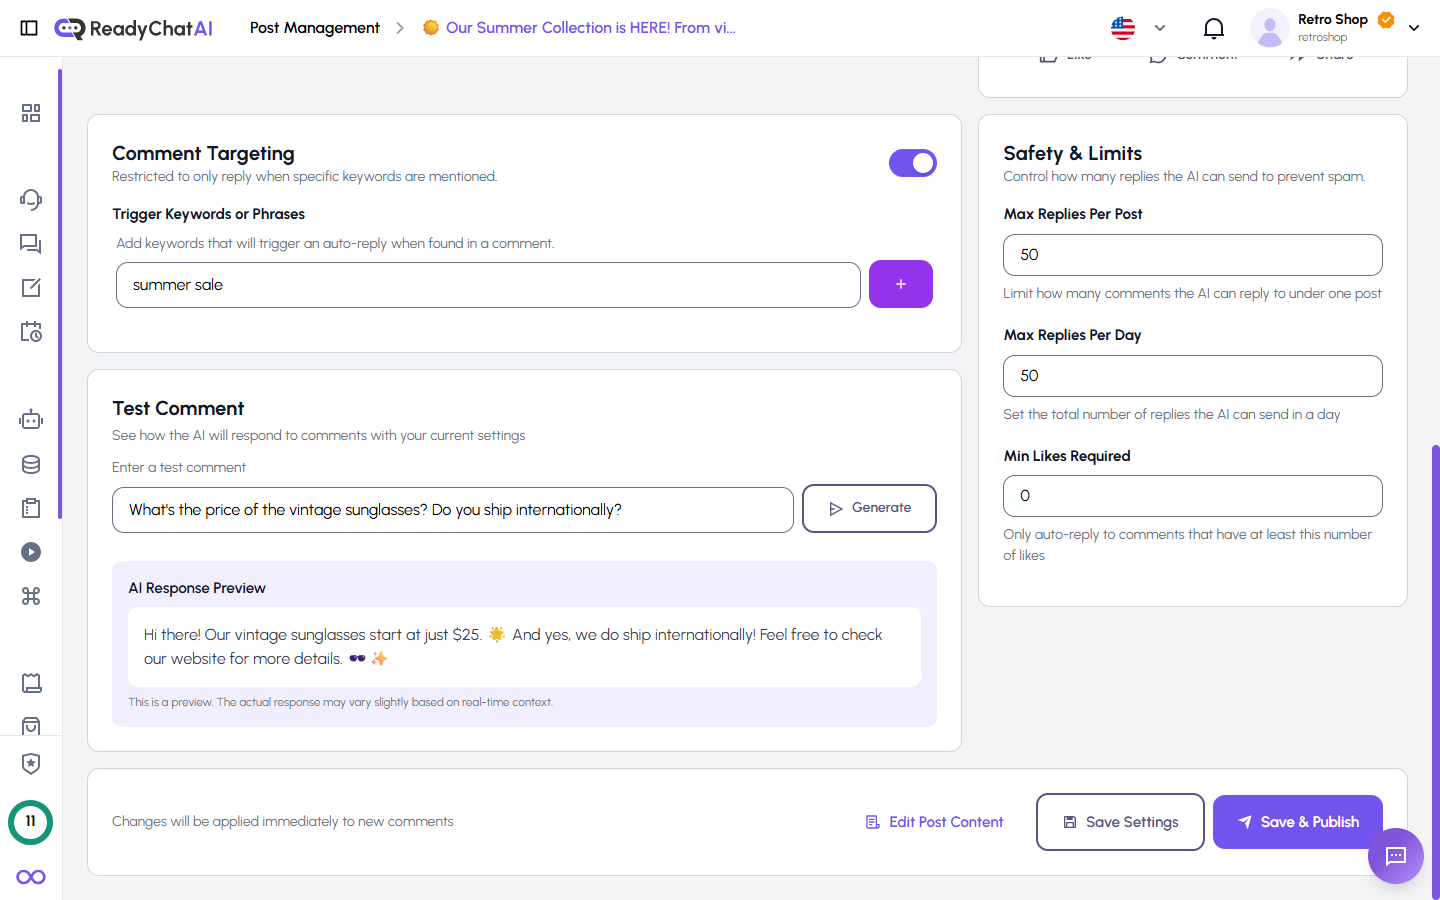 Preview AI-generated responses with test comments
Advanced Settings
Configure limits to control auto-reply behavior:
Max Replies Per Post Maximum number of auto-replies for this specific post. Set to 0 for unlimited.
Max Replies Per Day Maximum auto-replies generated per day for this post. Set to 0 for unlimited.
Min Likes Required Minimum number of likes a comment must have before triggering an auto-reply. Set to 0 for no minimum. This can help prioritize responses to more popular or engaged comments.
Saving Configuration
Save Saves the auto-reply settings and returns to the dashboard.
Save & Publish (draft posts only) Saves auto-reply settings AND publishes the post in one action. This button appears only for posts in Draft status.
Edit Post link (draft posts only) Navigate back to the post edit form to modify content or media before publishing.
How Auto-Replies Work
When auto-replies are enabled on a post:
- A user comments on your published post
- ReadyChatAI detects the new comment
- If keyword filtering is enabled, the system checks if the comment contains any trigger keywords
- If conditions are met (keywords match or reply-to-all, within reply limits, meets minimum likes), the AI generates a response
- The response is crafted using: your auto-reply context, business context (if enabled), and the original post content
- The response is delivered as a comment reply or direct message, depending on your channel settings
Account Auto-Reply Defaults
The Account Auto-Reply Defaults page lets you configure default auto-reply settings that are pre-populated when you create new posts. This saves time by eliminating repetitive configuration.
Access: Click the "Account Auto-Reply Defaults" button at the top of the Posts Dashboard.
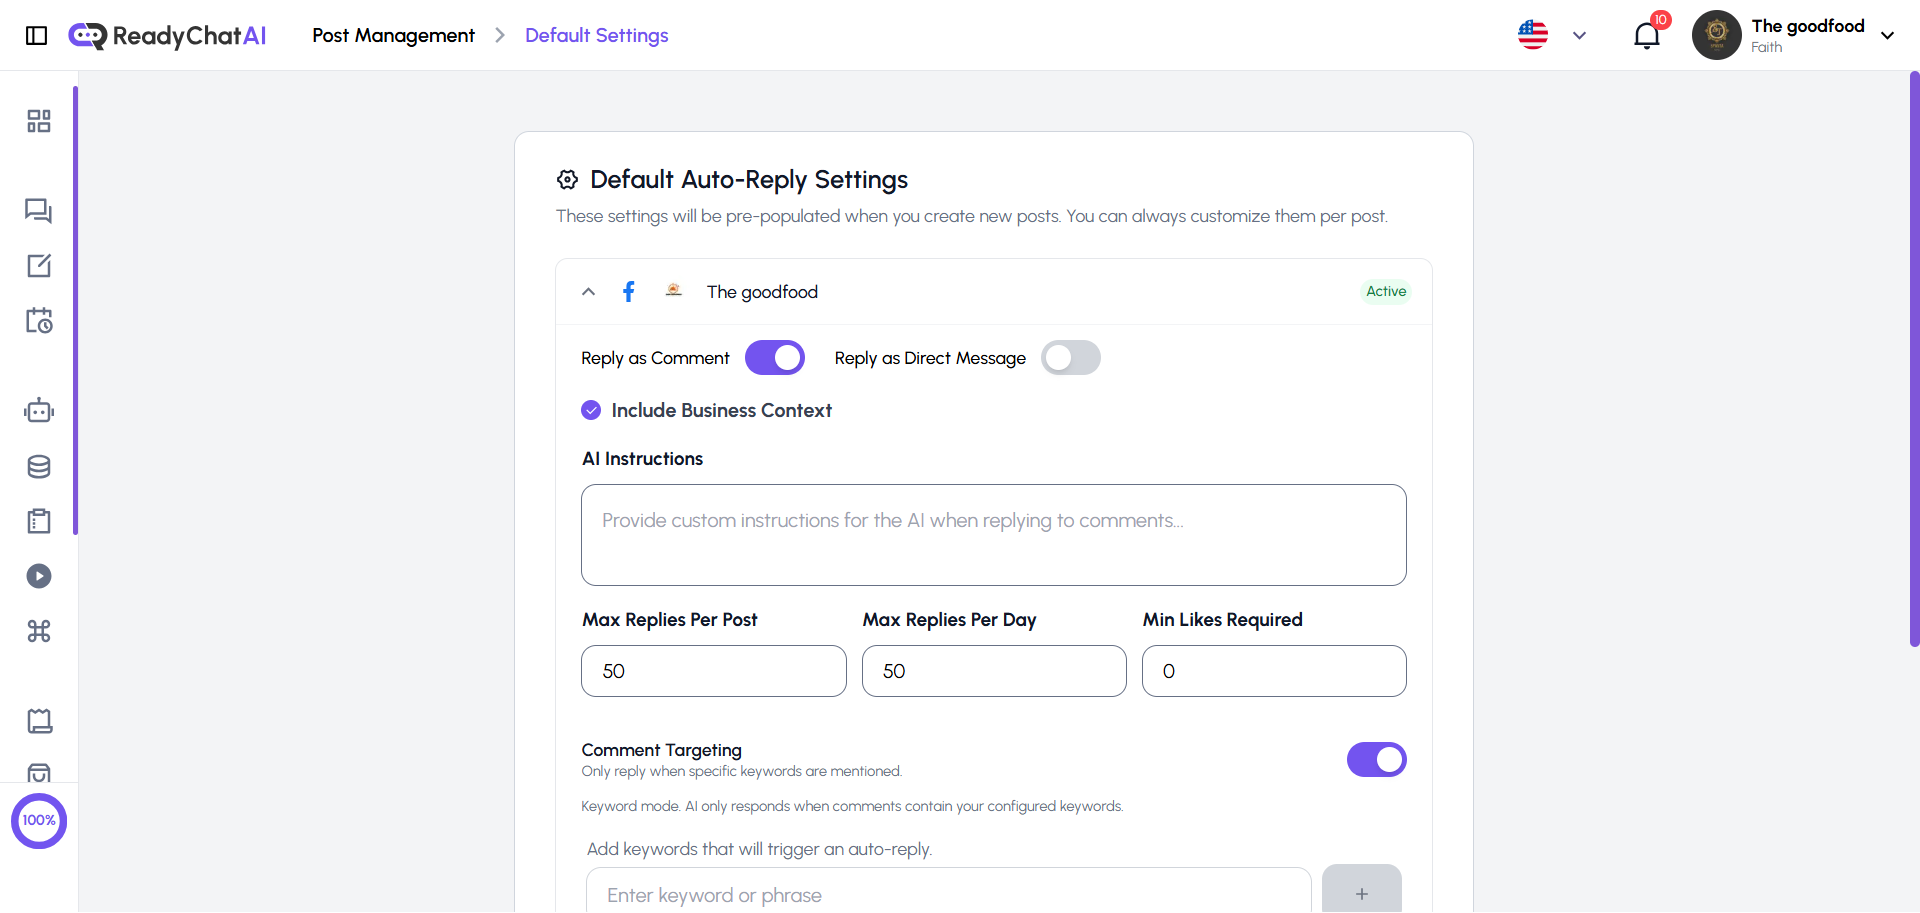 Configure default auto-reply settings per connected account
How It Works
The page displays all your connected social media accounts (Facebook and Instagram). Each account can have its own default settings:
- Reply as Comment — Toggle default for replying directly as comments
- Reply as Direct Message — Toggle default for replying via DM (Facebook only)
- Include Business Context — Toggle whether AI uses your business profile information by default
- AI Instructions — Default custom instructions for the AI when replying to comments
- Max Replies Per Post — Default maximum auto-replies per post
- Max Replies Per Day — Default maximum auto-replies per day
- Min Likes Required — Default minimum likes a comment must have before triggering a reply
- Comment Targeting — Enable keyword filtering by default
- Filter Comments with AI — Smart filtering that only replies to relevant comments (questions, purchase intent, support requests)
Click "Save Defaults" to save your settings. These defaults will be pre-populated for new posts, but you can always customize them per post.
Post Status Reference
| Status | Description |
|---|---|
| Draft | Saved but not published. Can be freely edited. |
| Publishing | Currently being posted to the social media platform. This is a temporary state. |
| Published | Live on the social platform. Content cannot be edited, but auto-reply settings can be modified. |
| Failed | A publishing error occurred. Review the error and retry. |
| Deleted | The post has been deleted. No actions are available. |
Troubleshooting
Feature Access Issues
If the Post Management page shows a security modal instead of the dashboard, the social comments feature needs to be enabled for your account.
Click "Enable" if you have social accounts connected, or "Go to Channels" to connect accounts first. The social comments feature is required for creating posts and managing auto-replies.
Post Failed to Publish
Common causes:
- Account disconnected or permissions expired
- Media file too large or unsupported format
- Platform rate limits exceeded
- Content violates platform guidelines
Solutions:
- Check account connection in Channels and reconnect if needed
- Verify media meets requirements (JPG, JPEG, PNG, GIF, WEBP; max 10MB per file)
- Wait and retry if rate limited by the platform
- Review content for policy compliance with Facebook or Instagram community standards
Auto-Replies Not Working
Check these settings:
- Auto-reply is enabled (at least one reply channel is toggled on)
- Reply channel is correctly set (comment or DM)
- If keyword filtering is on, verify your keywords match the comment content
- Max reply limits haven't been reached (check per-post and per-day limits)
- Min likes requirement isn't set too high
- The post is published (auto-replies only work on published posts, not drafts)
If auto-replies are still not working, test your configuration using the Test Comment feature to verify the AI is generating appropriate responses.
Media Upload Issues
Requirements:
- Accepted formats: JPG, JPEG, PNG, GIF, WEBP
- Maximum file size: 10MB per file
- Maximum files: Up to 20 images per post
- Instagram posts require at least one image
If uploads fail:
- Check file size and format
- Ensure stable internet connection
- Try uploading fewer files at once
- Clear browser cache and retry
Tips for Effective Posts
Content Strategy
- Consistency — Post regularly to maintain engagement and build audience expectations
- Timing — Post when your audience is most active
- Variety — Mix content types (photos, carousels, stories) to keep your feed interesting
- Engagement — Ask questions to encourage comments and trigger auto-replies
Maximizing Auto-Reply Value
- Use the Test Comment feature to preview AI responses before enabling auto-replies
- Enable Business Context for consistent, accurate brand voice across all replies
- Use specific trigger keywords for product-related or promotional posts
- Provide detailed custom context — the more specific, the better the AI responses
- Set appropriate reply limits to avoid overwhelming your audience
- Disable auto-reply for posts about sensitive topics that require personal attention
- Monitor reply quality regularly and adjust context as needed
Platform-Specific Tips
Facebook:
- Longer posts can perform well with detailed descriptions and storytelling
- Links are clickable and can drive traffic to your website or landing pages
- Video content tends to receive higher reach
- Auto-replies can be sent as direct messages for a more personal touch
Instagram:
- Focus on high-quality visual content with strong aesthetics
- Use relevant hashtags in your caption to increase discoverability
- Carousel posts tend to drive higher engagement than single images
- Auto-replies are delivered as comments only (DMs not supported)
Post Management in ReadyChatAI simplifies your social media workflow while adding the power of AI-driven customer engagement directly on your posts. Create compelling content, publish it, and let AI handle the conversation.